

How to Export Contacts from Windows Live Mail to new Outlook
Are you looking to export your contacts from Windows Live Mail to Outlook (New)? This step-by-step guide will help you seamlessly transfer your contacts, ensuring you can easily manage them in Outlook (new). Follow our instructions to ensure a smooth and efficient contact migration process.
What is Outlook (new)?
![]()

Features include AI-powered suggestions, spelling and grammar checks, and the ability to attach documents and photos to emails. The application supports multiple email services, such as Outlook.com, Gmail, Yahoo Mail, and iCloud, making it a versatile tool for managing emails and schedules.
Data Privacy: When using new Outlook, it’s essential to understand that it is an online version, meaning your data is transmitted to and stored on Microsoft’s servers. Microsoft implements robust security measures to protect your information. However, always ensure your internet connection is secure and avoid sharing sensitive information over unsecured networks to maintain data privacy.
Exporting Contacts from Windows Live Mail to CSV
In short, to export contacts from Windows Live Mail into Outlook (new), users need to export their contacts as a CSV file from Windows Live Mail, and then import that CSV file into Outlook (new). Here is how…
- Launch Windows Live Mail: Start the Windows Live Mail application on your computer.
- Access Contacts: Click on the “Contacts” tab located at the bottom-left corner of the window. This section contains all your stored contact information.
- Initiate Export: In the toolbar, click on the “Export” button to begin the export process.
- Select CSV Format: From the dropdown menu, choose “Comma Separated Values (.CSV)” to ensure compatibility with various applications.
- Choose Save Location: Click “Browse” to select a folder and file name for your exported contacts. Click “Save” to proceed with saving the CSV file.
- Pick Fields: Click “Next” and check the boxes for the fields you want to export (e.g., Name, Email, Phone Number). Make sure all necessary contact details are included.
Before completing the export by clicking “Finish,” double-check that the export settings confirm the use of commas as delimiters for the CSV file. - Finalize Export: Click “Finish” to complete the export process. Your contacts are now saved in a CSV file.
Possible Issue and Workaround
By default, Windows Live Mail saves CSV files using commas as delimiters. If your contacts are saved with semicolons (;) or other delimiters instead, this might be due to regional settings or specific configurations in the export settings. To ensure commas are set as the default list separator, check your regional settings in the Control Panel before exporting your contacts.
If you already have a CSV file with an incorrect delimiter, you can fix it by replacing the wrong delimiter with a comma. Otherwise, Outlook (New) will not import your contacts correctly. [Note by: Alex Shipman – Support Engineer]
Benefits of Exporting to CSV
- Compatibility: CSV files are widely supported by various email clients and contact management systems, including Outlook and Gmail.
- Ease of Import: CSV files can be easily imported into other applications, such as Outlook, Gmail, and more. This ensures seamless data migration.
- Data Backup: Exporting your contacts to a CSV file provides a reliable backup of your contact information. Keep your contacts safe and secure.
Importing CSV File into new Outlook
- Launch Outlook (new): Open the new Outlook application on your computer.
- Access Contact Management: Select the “People” option from the navigation bar to manage your contacts.
If “People” isn’t visible, click on “More apps” and then add “People” to your view.

- Begin Import Process: In the ribbon, click “Manage contacts” and then select “Import contacts” to start importing.

- Choose CSV File: Click “Browse” and select the CSV file you exported from Windows Live Mail. Make sure the correct file is chosen.
- Start Importing Contacts: Click “Open,” and then click “Import” to initiate the import process. Your contacts will now begin importing into Outlook.


If prompted: Map the fields from the CSV file to the corresponding fields in Outlook. This ensures that data is accurately imported. Click “Finish” to finalize the import process.
Your contacts are now successfully imported into Outlook (new). You may click to each contact to check the fields integrity.
Tips for a Smooth Import Process
If you encounter issues during the export or import process, here are some troubleshooting tips:
- Review CSV File: Before importing, review the CSV file to ensure all contact details are correctly formatted. Avoid any potential data issues.
- CSV Format Issues: Ensure that the CSV file uses commas as delimiters. If the file has semicolons or other delimiters, use a text editor to replace them with commas before importing.
- Regional Settings: If your contacts are being saved with incorrect delimiters, check your regional settings in the Control Panel. Ensure that commas are set as the default list separator.
- Import Errors: If you receive an error message during the import process, check the CSV file for formatting issues or missing data. Correct any errors and try importing again.
- Check for Duplicates: Use Outlook’s built-in duplicate checker to avoid duplicate contact entries. Maintain a clean contact list.
- Duplicate Contacts: If you notice duplicate contacts after importing, use Outlook’s built-in duplicate checker to merge or delete duplicates.
- Backup Contacts: Always create a backup of your existing contacts before performing an import. This precaution helps prevent data loss.
Backup Methods
Ensuring the safety of your contact information is crucial. Here are some reliable backup methods to keep your contacts secure:
-
- Export to CSV: Regularly export your contacts to a CSV file and store it on an external storage device like a USB drive or an external hard drive.
- Cloud Storage: Upload the CSV file to a cloud storage service such as OneDrive, Google Drive, or Dropbox for easy access and added security.
- Email Backup: Email the CSV file to yourself as an attachment. This provides an additional backup and makes it easy to retrieve if needed.
- Third-Party Backup Software: Utilize third-party backup software that automatically backs up your contacts and other essential data to secure locations.
FAQs
- Can I export contacts from other email clients to CSV? Yes, most email clients support exporting contacts to CSV files. Check the specific client’s documentation for detailed steps.
- What if my CSV file has errors during import? Review the CSV file for formatting issues or missing data. Correct any errors and try the import process again.
- How often should I back up my contacts? It’s a good practice to back up your contacts regularly, especially before making significant changes or updates.
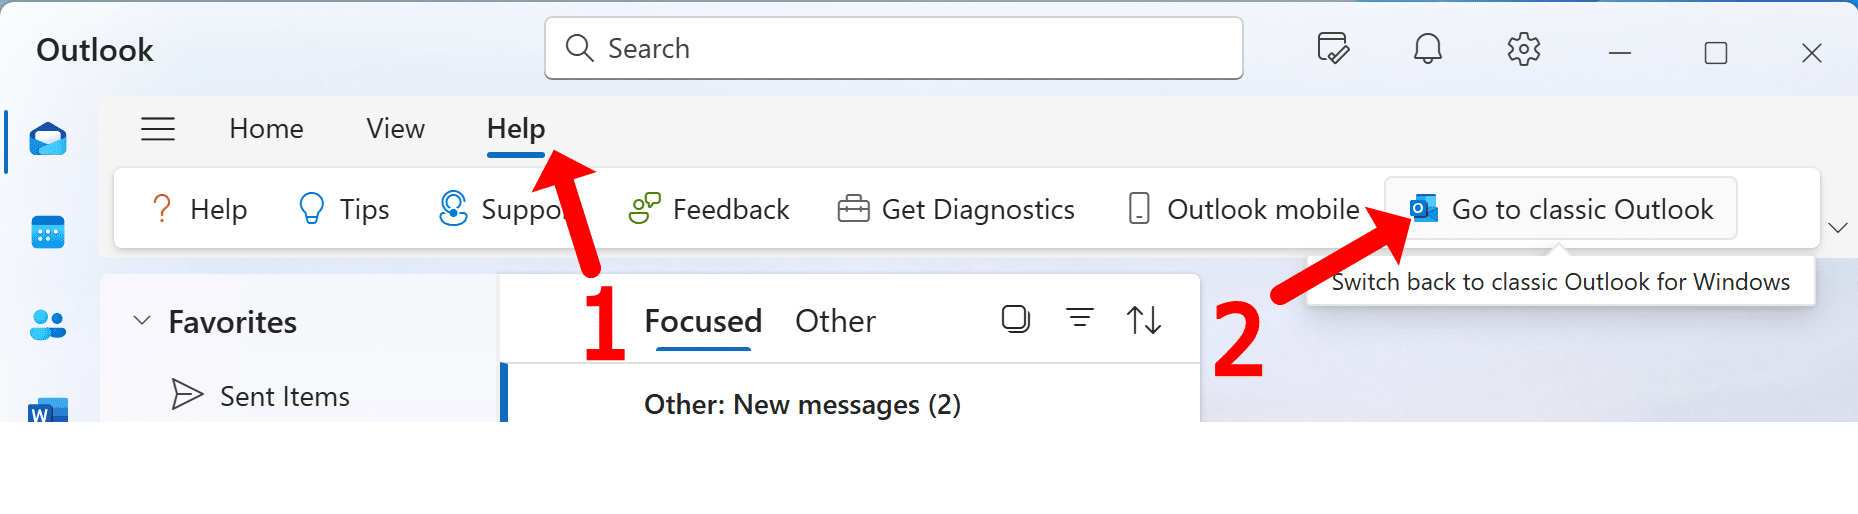
- How to switch back to Classic Outlook? For that use menu Help > Go to Classic Outlook

Conclusion
Exporting contacts from Windows Live Mail to a CSV file and importing them into Outlook (New) is a straightforward process that ensures your contact information is easily transferable and backed up. Follow the steps above, and you’ll have your contacts ready for import into any compatible application. Whether you’re migrating to a new email client or simply backing up your data, this guide will help you achieve a smooth and efficient transfer.
Please note: To guarantee the precision and reliability of this article, our IT expert, Alex Shipman, has meticulously reviewed and amended it. This step was necessary because the initial technical content was generated by AI. Our goal is to deliver content that is not only accurate and consistent but also clear and engaging, enhancing your online experience.