


I’m excited to share my experience with you. Learning to BCC in Outlook has made my email communication smoother and more professional. So, let’s dive in!
Table of contents:
Every given second, millions of emails are sent and delivered across the world. In electronic correspondence, it is sometimes necessary to keep certain addressees hidden from plain sight. The motives for doing so vary from privacy concerns to shady intentions, but any version of Outlook includes bcc email, and the option is easy to apply. Here is a step-by-step guide for on how to blind copy in Outlook. But first, what circumstances could possibly prompt you to conceal the people you are contacting?
What is BCC in Email?
Let me tell you about BCC, or Blind Carbon Copy. This nifty feature allows you to send an email to multiple recipients without them knowing who else is on the mailing list. Think of it as a way to keep things private and organized. Each recipient in the BCC field won’t see the other addresses, making it perfect for maintaining privacy.
Basically, it lets you email an identical text to a number of people in such a way that none of them knows who else is on the mailing list. Hence, each bcc recipient will only see email addresses in “To…” and “CC”. In essence, it works in the same way as the latter function (carbon copy email) but makes the selected contacts invisible. You may label it CC for spies, which sounds like a tool for people with questionable motives. Hence, here are a few words of caution.
Why I Use BCC in Outlook


A widely accepted rule of thumb nowadays is to apply it when the number of addresses goes beyond 30. Here is when you should and shouldn’t use the blind copy in Outlook.
I started using BCC in Outlook after realizing how important privacy is in my emails. Here are a few reasons why BCC has been good for me:
- When I send an email to a group of people who don’t know each other, BCC keeps their email addresses confidential. So it is good for privacy.
- Using BCC prevents a cluttered list of email addresses in the header, making my emails look cleaner and more professional.
- BCC helps me avoid those annoying reply-all chains that can flood everyone’s inbox.
When Not to Use BCC
Now, if we wanted to keep things transparent, we’d have to be cautious about using BCC in certain situations:
- Office Correspondence: In a professional setting, using BCC might come off as secretive. It’s better to use the CC field to keep things open and honest.
Office correspondence is where the option is frowned upon. It looks shady when you try to make someone believe they are the only person getting your email. Besides, within an office space, there can hardly be any proper rationale behind it, except for the need to manipulate others. Use CC instead. It does the same thing – adds contacts who will read the email but do not have to respond – but does it openly. Hence, if you have to copy people in, do so, but never pretend you have not.
- Personal Invitations: For personal events, like parties, using BCC can seem impersonal. I prefer sending individual emails or using a group email list.In personal correspondence, never use it on invitations to your party. Unless your friends are spies or celebrities, this will look either suspicious or insulting. So, how do you add a bcc address in Outlook? Below you will see the sequence of steps allowing you to add a bcc recipient.
How to Add BCC in Outlook
Adding BCC in Outlook is pretty simple. Let me walk you through the steps I follow:
Adding BCC When Composing a New Outlook Email

- Open a New Email. First, open Outlook and click on “New Email” to start a new message.
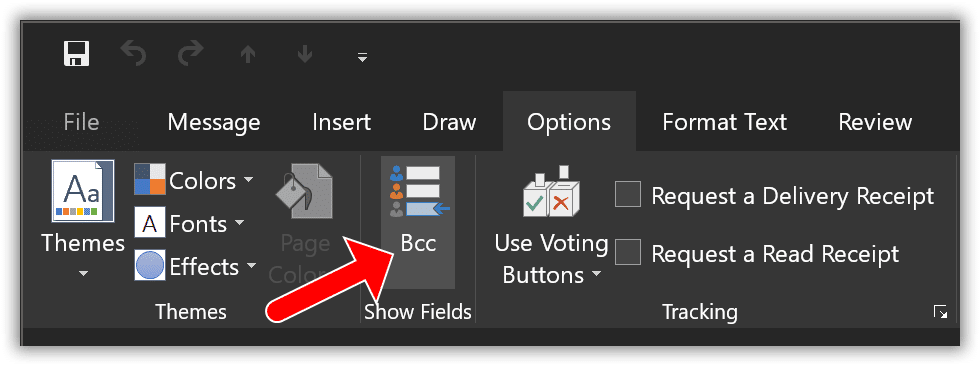
- Access the Options Menu. Head to the “Options” tab in the ribbon menu of the new email window.
- Show BCC Field. In the “Show Fields” group, click on “BCC” to enable the BCC field.
- Enter Recipients. In the BCC field, enter the email addresses of the recipients you want to blind copy. The “To” field must have at least one email address.
- Compose and Send. Write email and click “Send”. The BCC recipients will get the email without knowing who else is on the list.
Adding BCC When Replying or Forwarding an Email
- Open the Email. Open the email I want to reply to or forward.
- Access the Message Menu. In the email window, go to the “Message” tab in the ribbon menu.
- Show BCC Field. Click on “BCC” in the “Show Fields” group to enable the BCC field.
- Enter Recipients. In the BCC field, enter the email addresses of the recipients you want to blind copy.
- Compose and Send. Write your reply or forward the message, then click “Send”.
Benefits of Using BCC
Here are some benefits I’ve found from using BCC in Outlook:
- Improved Privacy: It keeps recipient email addresses confidential.
- Enhanced Professionalism: It prevents clutter in the email header, making my emails look cleaner.
- Efficient Communication: It reduces the likelihood of reply-all chains, ensuring communication stays relevant and concise.
Common Mistakes When Using BCC
I’ve learned to avoid these common mistakes when using the BCC feature:
Forgetting to Add a Primary Recipient
One thing I’ve learned is to always include at least one address in the “To” field. There were times when I forgot to add a primary recipient, and it led to confusion or delivery issues. By making sure there’s at least one email address in the “To” field, we can avoid potential errors and ensure that our emails appear legitimate and properly addressed. It’s a small but crucial step to maintain professionalism and clarity in our communication.
Overusing BCC
I’ve also discovered that overusing the BCC feature can come off as secretive or lacking transparency. It’s important for us to use BCC sparingly and only when necessary to protect recipient privacy or manage large email lists. Over-reliance on BCC might cause our recipients to question the intent behind our emails. Instead, I’ve found that creating email groups or using the CC field for open communication can help strike a balance. This way, we enhance trust and clarity in our emails.
Not Informing Key Recipients
In my experience, not informing key recipients about important information can lead to misunderstandings and missed tasks. Even if some stakeholders aren’t included in the BCC field, we should make sure they receive all relevant details. Transparency and thorough communication are essential for effective collaboration and preventing any potential issues. By keeping everyone informed, we demonstrate professionalism and foster a cooperative environment.
Troubleshooting BCC Issues
If you encounter issues with the BCC feature, here are some tips I’ve found helpful:
- BCC Field Not Visible. Ensure the BCC field is enabled in the “Options” or “Message” tab.
- Recipients Not Receiving Emails. Verify the email addresses are entered correctly and that your email server supports BCC.
- Email Formatting Issues. Check your email format settings to ensure proper display of the BCC field.
Conclusion
My journey with the BCC feature in Outlook has been a valuable experience. It’s a fantastic tool for maintaining privacy and professionalism in email communication. By following these steps, you can use BCC effectively and enhance your email practices. Remember to use BCC thoughtfully to avoid common pitfalls and ensure clear, respectful communication.
More Knowledge Base articles