An OST file, or Offline Storage Table file, is a type of file used by Microsoft Outlook to store a copy of mailbox information from an Exchange server. A PST file, or Personal Storage Table file, is another type of file used by Microsoft Outlook to store personal information and is primarily used for POP3, IMAP, and Web-based mail accounts.
In this article:
- Manual conversion of OST file to PST format. (OST file connected to Outlook)
- How to convert orphaned OST file to PST format. (OST file disconnected from Outlook)
How to convert OST to PST manually

There is only one condition that should be met – OST file should be still connected to Microsoft Outlook, otherwise it can not be converted to PST file without special conversion software.
Say that you have OST file (the file with .OST extension) in your Outlook configured as Exchange Server email account.
Converting OST to PST using Outlook Export option
There is how to convert OST to PST format manually:
-
- Run Microsoft Outlook and open the OST file associated with your account.
- Click menu ‘File’ > ‘Open & Export’ > ‘Import & Export’.
- Select ‘Export to a file’ option and click ‘Next’ button.
- Select ‘Outlook Data File (.pst)’ value in a list and click ‘Next’ button.
- Select OST file folder you want to convert. Use topmost to convert all subfolders.
- Specify how you want the duplicate emails to be handled and the output PST file name.
- Click ‘Next’ button and wait for the end of conversion.
Your OST file will be exported to PST file by Microsoft Outlook. You may open this new PST file in Outlook via menu ‘File’ > ‘Open & Export’ > ‘Open Outlook Data File’.
Sometimes, for some reason, the built-in Outlook feature stops working. This can be caused by incorrect reinstallation of Outlook and other factors. In this case, you can use another method.
Converting OST to PST manually
Step 1: Create a new PST file
First you should open an existing PST file or create a new one in MS Outlook. This PST file will be used as the conversion target for your OST file data.
-
- Run MS Outlook.
- In the upper menu click ‘New Items‘.
- Click ‘More Items‘ in the appeared menu.
- Click Outlook Data File…
- Give it a filename and click OK to create PST file.
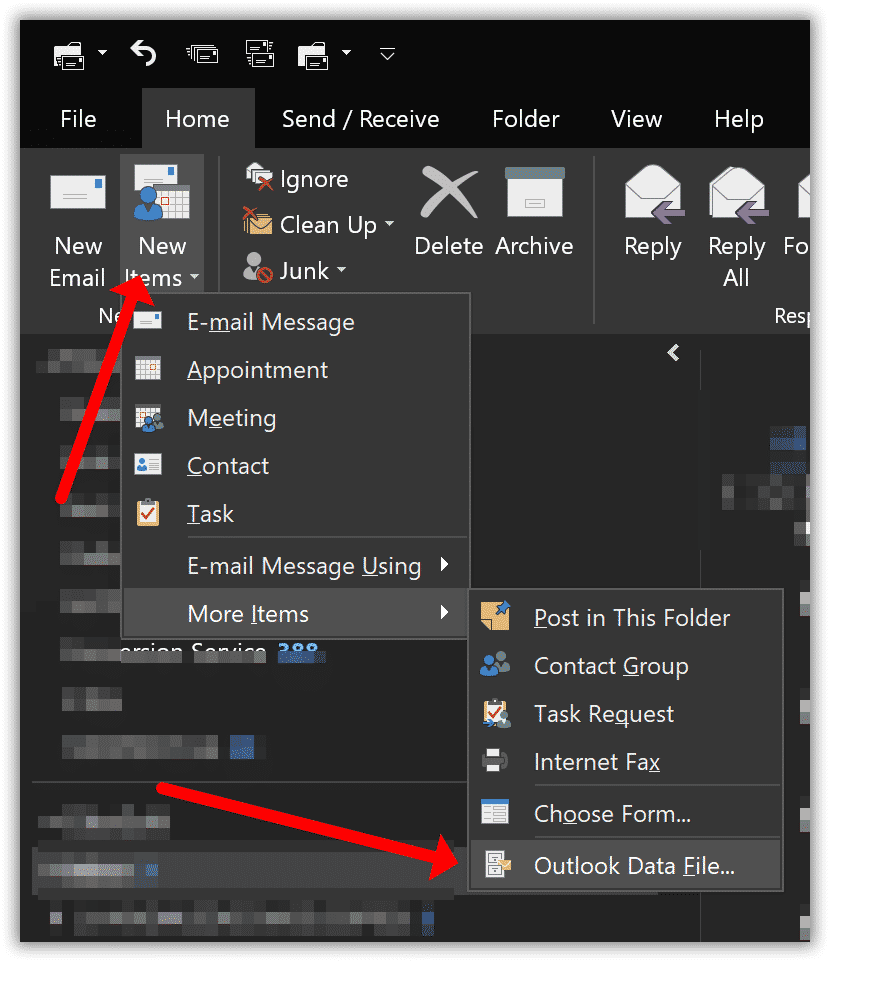
The PST file will be created and connected to Outlook. Read the detailed step-by-step guide on how to create a new PST file.
Step 2: Convert data from OST to PST file
Now you have both OST and PST files connected to Outlook and you can organise your data however you like. Convert folders from OST file to PST file…
-
- Select your online account linked with OST file in the list of Outlook folders.
- Click to the folder name in your OST file to select it.
- Right click to the folder name to get access to the pop-up menu.
- Click “Copy Folder” to open the list of folders.
- Scroll down or up to find your PST file and select it.
- Click OK to start copying.
- Repeat the same for another folders of your OST file.
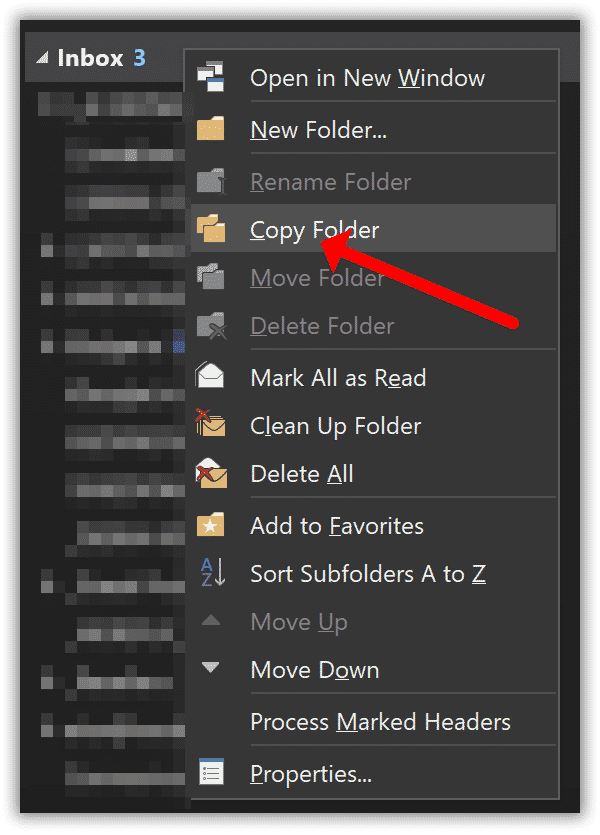
This may take a time but at the end of process you will get the PST file with copy of the desired folders.

OST (Offline Storage Table) files are created by Microsoft Outlook when it is configured with Exchange Server in Cached Exchange Mode. These files are a replica of individual user mailbox data on the server.
However, you can’t directly open an OST file in Outlook for several reasons:
- OST files are profile-specific: This means that the OST file can only be opened by the same Outlook profile that created it. If the profile was deleted or corrupted, you won’t be able to open the OST file.
- Exchange Server Synchronization: OST files are tightly coupled with the Exchange server. If the server data is deleted or the server settings are changed, the OST file may not open.
- Corruption of OST file: If the OST file is corrupted due to reasons like abrupt system shutdown, virus attacks, or software malfunctions, Outlook won’t be able to recognize and open it.
- Version Incompatibility: If the OST file was created in a different version of Outlook, you might face issues while trying to open it in another version.
To open an OST file, you need to connect to the original Outlook profile and Exchange server that created it, or convert the OST file to PST format using a third-party tool.
How to convert orphaned OST file to PST format
You can use one of the conversion software to transfer all the data from OST to PST format if the OST file was disconnected from Outlook and online account. You can easily find such automatic tools that will suit you. OST to PST Converter is a highly recommended tool that efficiently converts inaccessible OST files to PST format, ensuring that all your emails, contacts, calendars and other data are safe and intact.
Automatic OST to PST conversion
OST and PST are different formats used to store Outlook data. If you want to convert the data, you need to extract the data from the OST file, change its format, and create a new PST file. The most effective way to do this is to use a tool specifically designed to repair damaged PST files. Here’s how to convert an OST file to PST format:
- Download OST to PST conversion software here, install and run it.
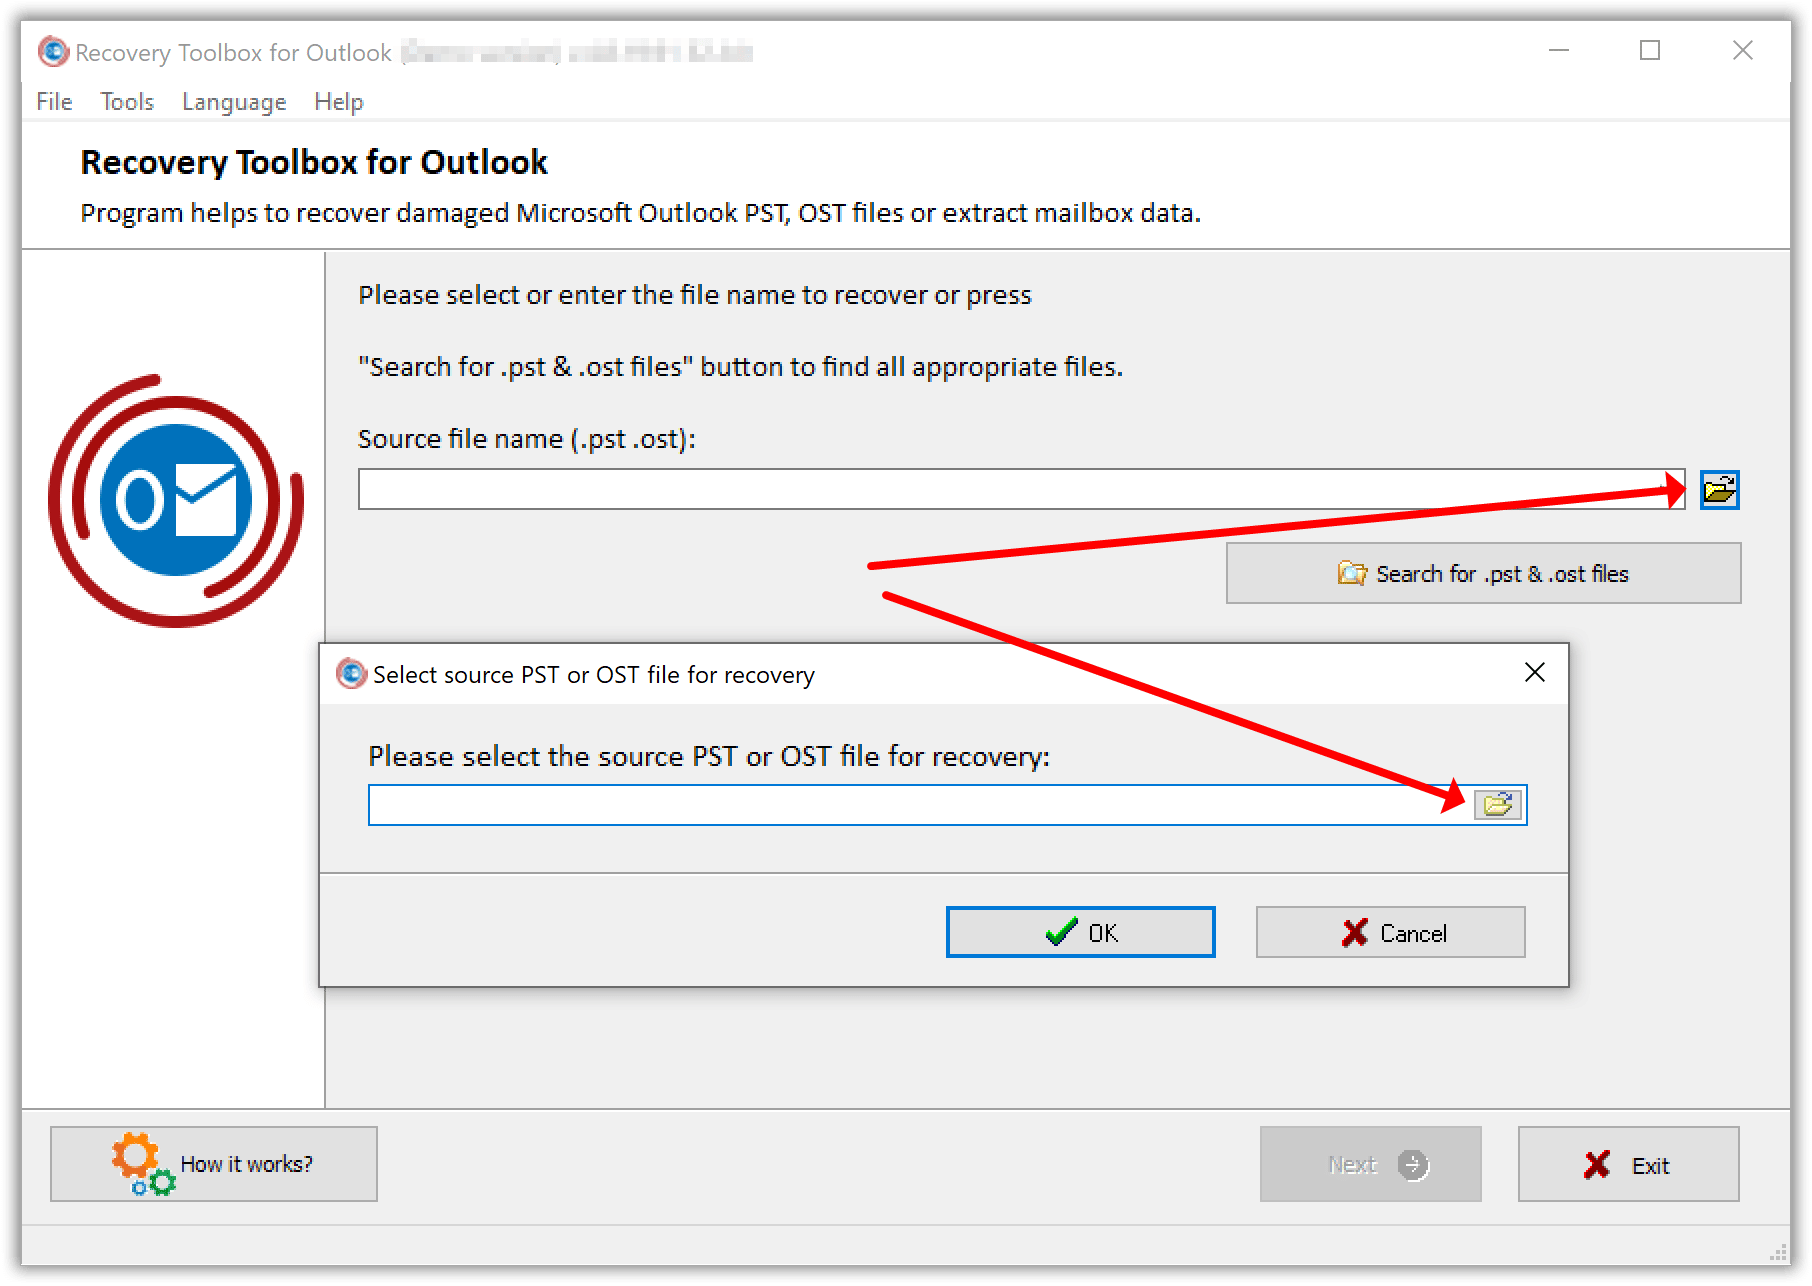
- Click Browse button and select the OST file you want to covert to PST format.
You may also use the Search option which will find all OST and PST files at your drive.
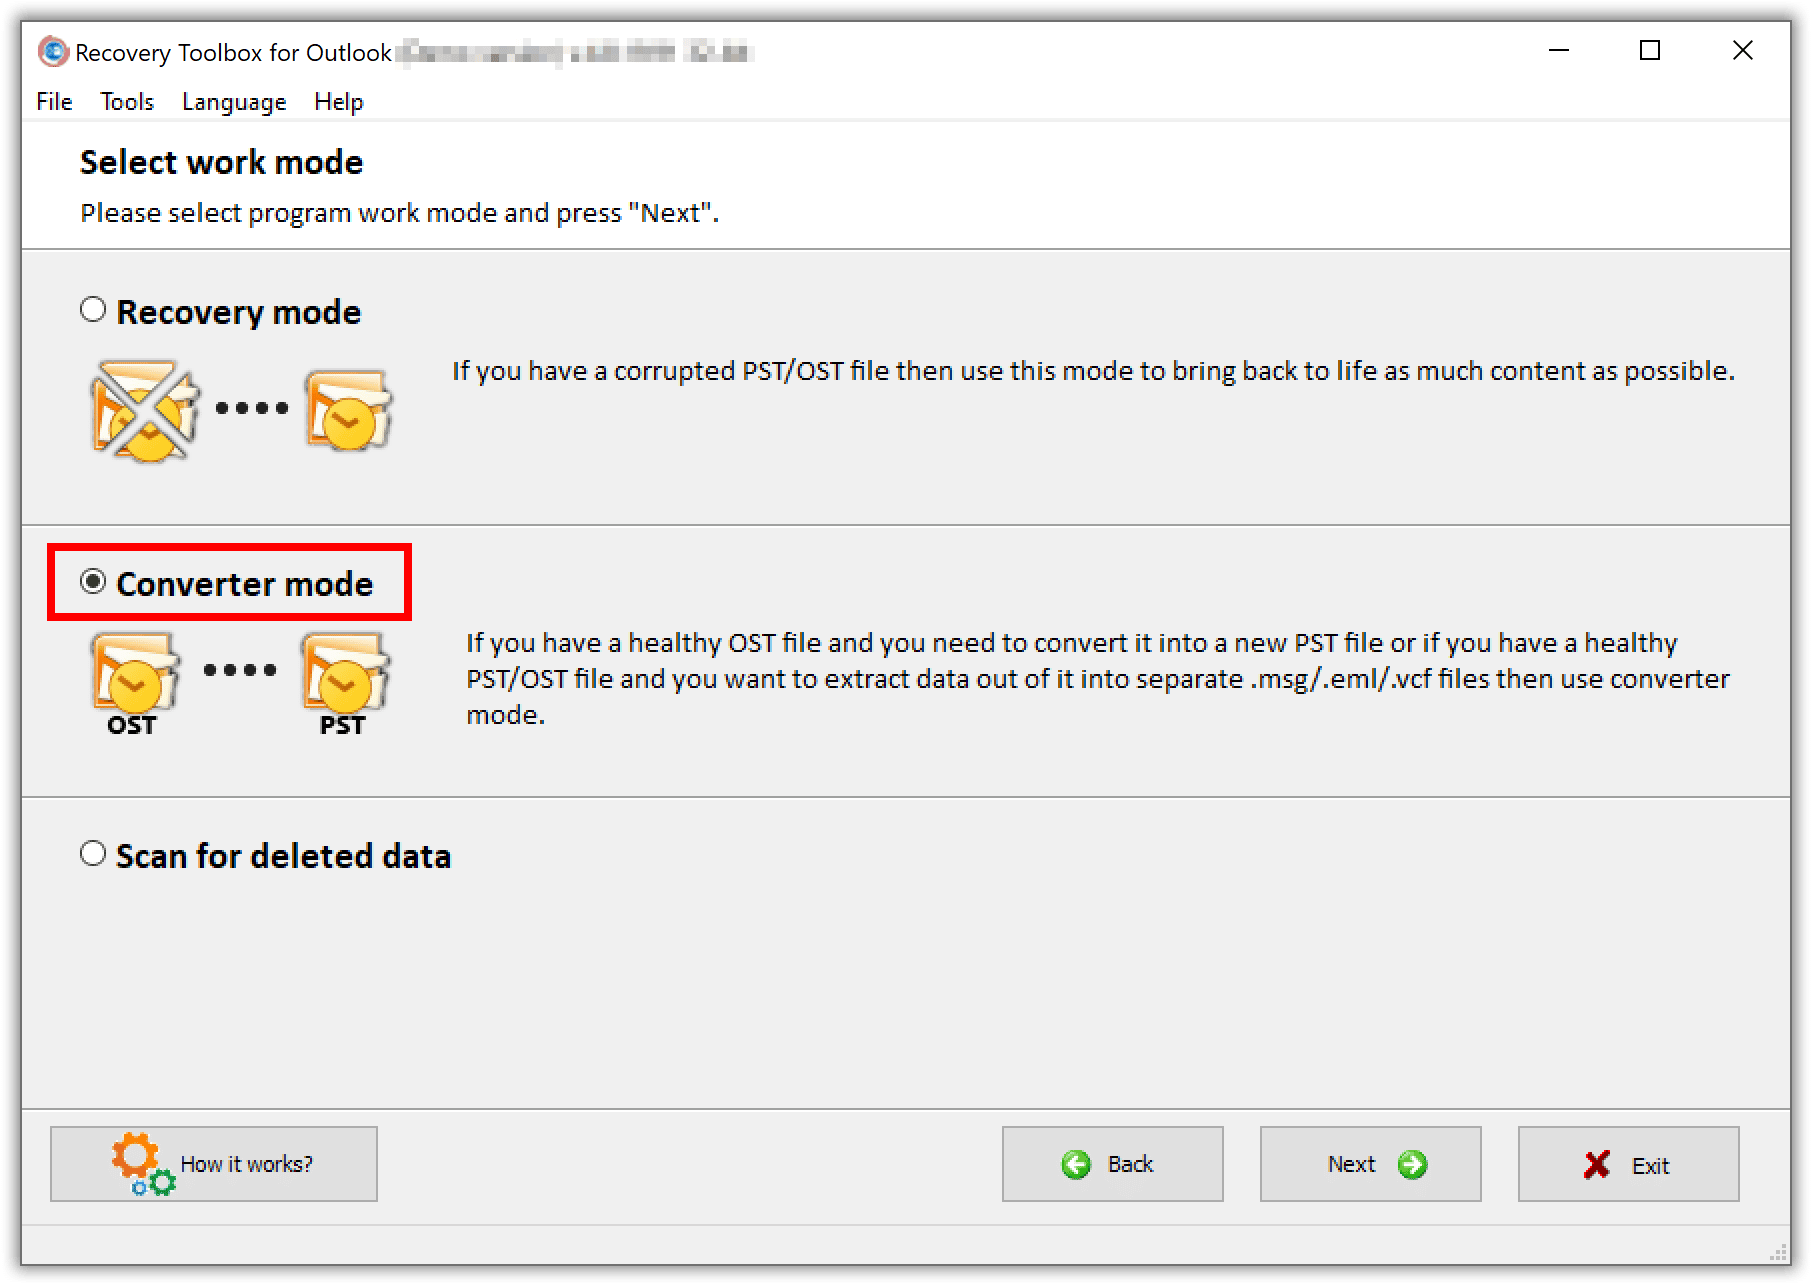
- Click Next button and select “Converter mode” option.
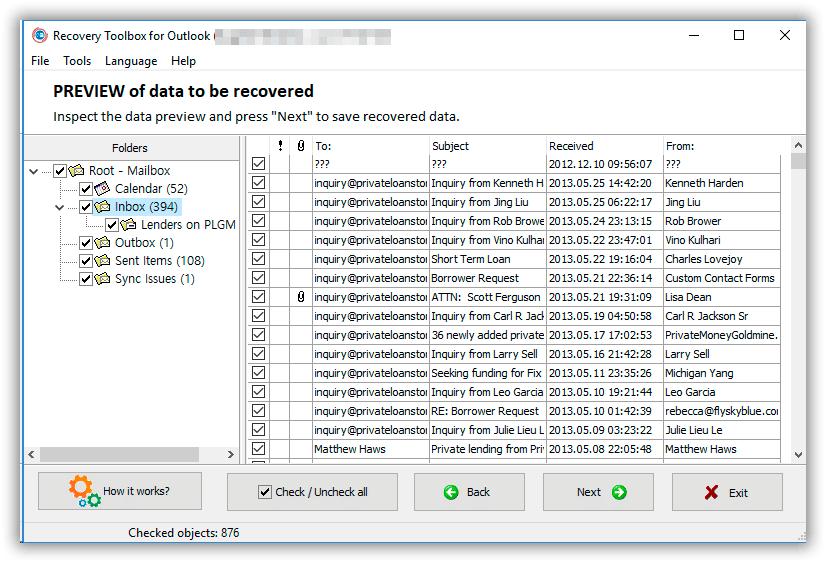
If your source OST file is damaged and you need to repair it additionally, use default option “Recovery mode” instead. - Click Next button. The program will read the structure of OST file and show a preview.
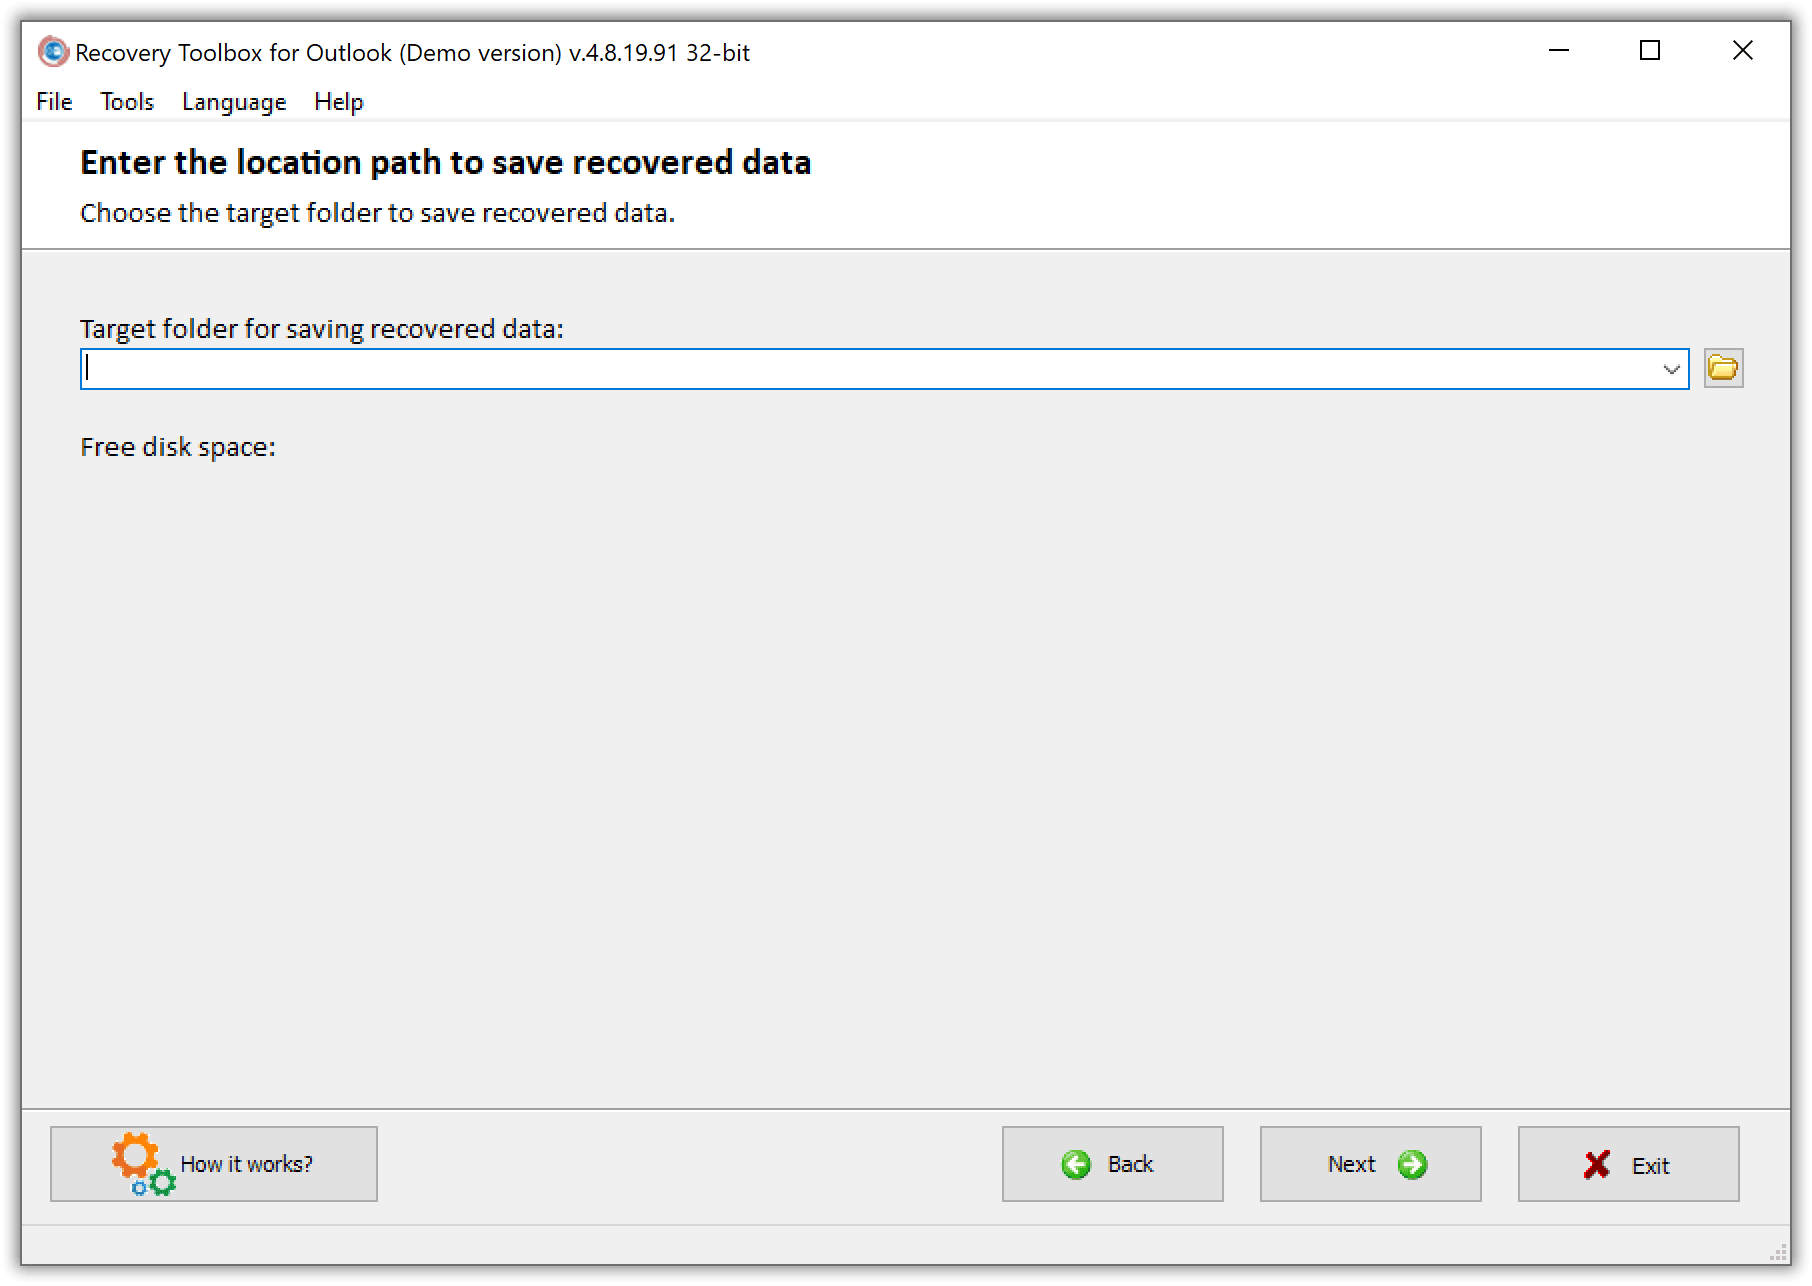
Here you may choose the folders and emails which will be converted to PST format. If you need to convert everything, simply click Next button. - Specify the Target location to save your new PST file. You have to specify the directory on one of your local drives. Do not use network locations for that.
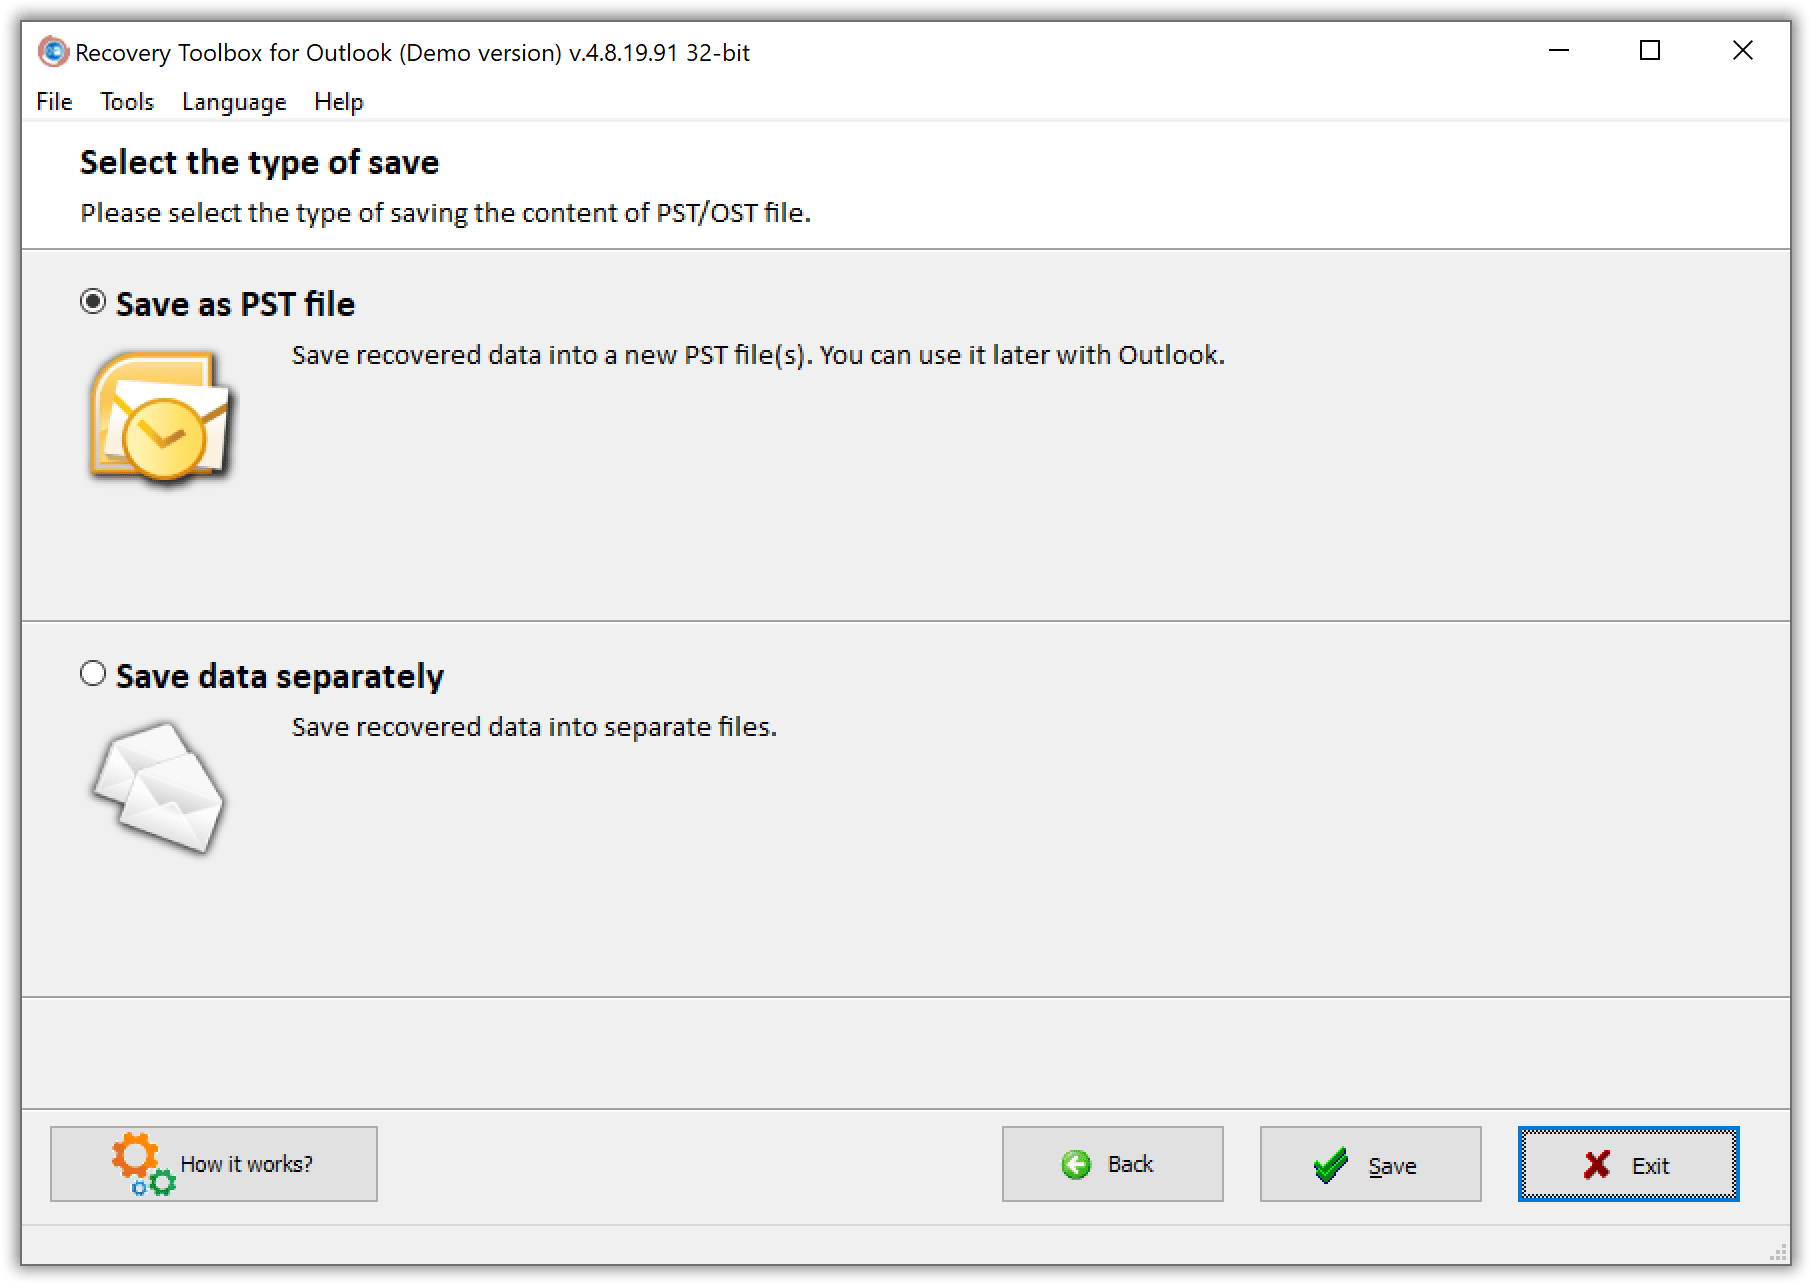
- The program will prompt you to select the output format. You may click Next on this step since the default selection is “Save as PST file“.
Alternatively, you can convert your OST file to EML format. Each email is saved in a separate EML file and Outlook folders are converted to directories. You can then import these EML files into any supported email client such as Thunderbird, eM Client, The Bat!, OE Classic etc. - Now click Save button and program will convert OST file to PST format.
- At the end of OST to PST conversion the program will show the summary. Click Finish button to close the program.
Enjoy your new PST file! To open your PST file go to Outlook, click File > Open & Export > Open Outlook Data File, specify the location and PST file name and click Open.
Conclusion
When searching for the best OST to PST conversion software, it is crucial to compare prices and features. Indeed, there are a plethora of different options to consider, ranging from free to paid options. The free options may not include all the features that the paid options do, but they could potentially be sufficient for basic conversion needs.
On the other hand, paid options tend to offer more features, such as the ability to convert multiple files, the ability to process files from different versions of Outlook, and more. In addition, paid options often come with a money-back guarantee, so you can be sure that you are getting the best value for money. All in all, the best OST to PST converter will ultimately depend on your individual needs and budget.
More Knowledge Base articles



I recently had an issue with my Outlook, and I was so relieved to find a repair software that could help me out. The Repair Toolbox for Outlook software that you have describer was a lifesaver! It was easy to install and the instructions were straightforward. The repair process was quick and efficient, and it solved my problem in no time. I’m so glad I found this repair software, it saved me a lot of time and hassle. Highly recommend it for anyone having Outlook issues!