Sometimes, you may need to send a bunch of identical emails. If the recipient sees dozens of addresses in the ‘To:’ field, your message looks cold and impersonal. Merging is an easy way to mask mass mailing. For any of the addressees, there is simply no way to detect other contacts. The feature is more convenient than blind copies. Moreover, it allows Outlook Mail Merge with attachment. Here is a detailed guide to help you get started.
A merge may be applied to different outputs: emails, separate documents, printers, etc. This article will zoom in on emails to convey the general principles. Other categories are set up similarly to Outlook Mail Merge Attachment. The goal can be achieved in different ways and through different means. Third-party tools enhance the convenience and offer additional options. But first, let’s deal with the basics.
Mail Merge with Attachments from Outlook
This path to Outlook Mail Merge is the easiest. When all addressees are already in your contacts, it is natural to use this list as a source. In the following example, we will show you how to send a message to a group of contacts. Our email will ask them to confirm their contact details.
Necessary Precautions
Bear in mind that mass mailing is generally frowned upon, and your Internet Service Provider may get suspicious. To make sure your attempt is successful, learn about their rules. The number of messages you can send over a period (hour/day) may be restricted. However, 100 is a common threshold. Hence, if you send 99, this can hardly cause problems.
In the case of stringent limitations, there are still ways to circumvent them. Dedicated merge utilities with scheduling divide your correspondence into smaller batches. These remain under the radar.
Step 1: Selection of Recipients
The procedure begins with marking of the necessary contacts. To do this:
- Head to the folder containing them (‘Contacts’). This may be summoned by CTRL+3).
- Pick the recipients or use filtering. To do it quickly, perform a search, or sort by category.
In the first case, you can search by a detail that all of these contacts share (e.g., Company Name). The task is a piece of cake. It is even possible to perform advanced queries. In the second case, you need to make a few moves to sort the Contacts folder by the required criteria (e.g., company name). The procedure depends on your version of Outlook.
In the 2007 edition, follow the sequence View > Current View > By Category. In later versions (including Office 365), the View tab contains the option Change View. Use it to set either Phone or List view. Next, from the same View tab, choose Arrangement and Categories. Thus, there is no difference between mail merge with attachments Outlook 2013 and mail merge with attachments Outlook 2016.

Step 2: Summoning Mail Merge Window
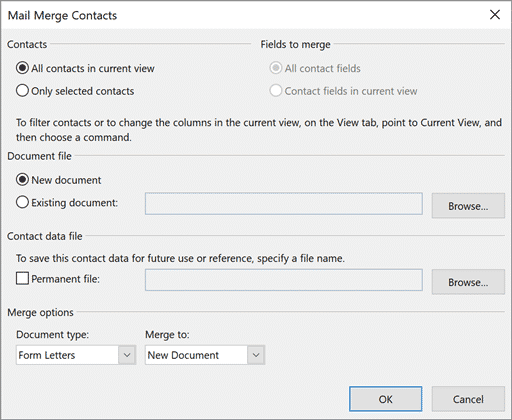
In the 2007 edition, access the feature immediately via Tools. In all subsequent versions, head to the Home tab, choose Actions, and click on Mail Merge. A dialog titled Mail Merge Contacts will pops up.
Step 3: Checking Contact Options
Now, it is necessary to ensure the right recipients have been selected. If you have already filtered the data, go for All contacts in the current view. If recipients were selected manually, choose Only selected contacts. It is possible to merge either all contact fields or only those in the current view.
Step 4: Merge Options
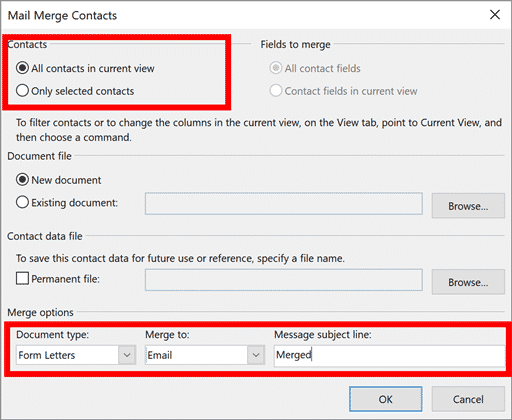
These may be adjusted at the bottom of the dialog. In our example, we will specify the type of document as Form Letters and set Email as a merging destination. You also need to enter the subject line. It may be changed later if necessary. For illustration, suppose the subject is <Contact information check>. Conclude with OK. Now, the word processor is summoned.
Step 5: Using Word
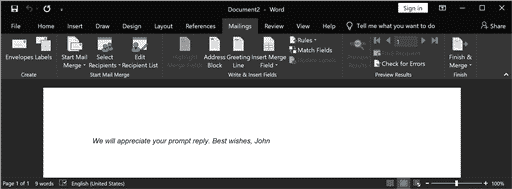
By default, the word processor shows an empty page. On the Ribbon, open the tab titled Mailings. In our example, we will send the same message with a couple of variables. This ensures each email looks as if it was crafted individually. Do not worry: variables are easier to insert than you may suppose.
Enter Your Greeting
On formal correspondence, the opening line always contains a greeting. Click on the corresponding button at the top, and specify desired information. There are templates (e.g., ‘Dear’), but you may also replace them with your own words (e.g., ‘Hello’). Remember to include a space after the first element. Otherwise, it will fuse with the recipient’s name.
It is also necessary to program actions applied to invalid recipient names. If you chose ‘Dear Mr. X,’ as a greeting, but a contact includes no last name, the system may use an impersonal salutation (e.g., ‘To Whom It May Concern’). Conclude with ‘OK’. The window will close.
Enter the Body
Now, we can start typing the body. Press the Enter key to begin. In our example, the text to be typed is “Would you mind checking if the following information is valid?”. Press the Enter key again to start another line. Here, we will insert the email address of each recipient.
To do so, click on Address Block. The addressee has already been greeted by name, so it is necessary to avoid repetition. Uncheck the box Insert recipient’s name in this format:. You may choose to remove or keep the company name. Conclude with OK.
Press Enter to switch lines. Here, we will insert each recipient’s office number. To do this, use the option for inserting merge fields. Select Work Phone and Insert. Close the window and press Enter.
Enter Your Closing
Now, it is time to type in closing for our message. Enter something like “We will appreciate your prompt reply. Best wishes, <your name>“. Almost done! All that’s left is to preview the result (message) to make sure it looks as you planned.

Use the corresponding button at the top, and the arrows to the right of it. They allow you to switch between versions for different recipients. Finally, we can send our emails. This is initiated via Finish & Merge at the top. Choose Send E-mail Messages… and check the details in the new dialog. Confirm with OK.
Using Outlook as Source
In this example, we will send the same email to several recipients. The only difference is that the action is programmed via the mail client. The dialog box will look different, but the basic principles are identical. Launch the program and summon the wizard. This is done by going to ‘Mailing’ and launching the merge. Summon Step by Step Mail Merge Wizard and proceed from there.
You will see a special panel on the right-hand side of the interface. Titled Task Pane, it allows parameter adjustment. Choose E-mail messages as a document type. Click Next once, and again in the subsequent dialog, as we will be entering the contents manually.
The contact information is stored in Outlook. Hence, opt for Select from Outlook contacts. Pick the folder containing your recipients’ details. This is achieved via Choose Contacts Folder. You may see a profile prompt. Wait for the operation to finish.
You will now need to mark the contacts to email. The window Mail Merge Recipients has many filtering options. Be patient, as it can be slow. To speed up the process, you may use the Find duplicates… feature.
Next, enter the message. The system automatically suggests variables. Preview the message and send it. Use the Electronic Mail feature to set the necessary options (To: and Subject line:). Finalize with OK and let the sending commence.
Using Another Source
It is possible to initiate the merge from Word, but retrieve contact details from Access databases, Excel sheets, or some other source recognized by the processor. The procedure is similar to the second approach. The only difference is an extra step that ensures merge fields are matched properly.
In this scenario, you follow the initial steps until the wizard is summoned. Then, program it to use a list that already exists in your system. Next, specify the contact data location. Sometimes, you may need to enter special characters that keep rules and columns separate. These are referred to as delimiters.
Select the source, filter contacts if necessary, and proceed to matching. At this step, fields from the source are matched to mail merge fields. This allows you to apply handy features like Greeting Line. Once Match Fields is clicked, you will see another dialog facilitating the process. Click OK when done.
Using Mail Merge Toolkit
It is possible to achieve the goal more quickly by using third-party utilities. They come particularly handy for email mail merge with attachments.
With external automation, you get many useful options. First, it allows more versatile merge with attachments. Each recipient can receive an individual attachment. It also allows you to customize the Subject line, and send both ordinary and blind copies.



Thank you for this guide, very useful. How I may merge the email attachments without merging the messages?